robotics-university.com | Hello friends, today I invite you to learn about one of popular 32-bit microcontroller chip. This microcontroller chip produced by ST microelectronics (STM). On this article, I will make a guidance to get started STM32 chip programming using Coocox CoIDE. Why Coocox CoIDE? Because Coocox CoIDE is free to use and has complete feature as an IDE software. On this project, I use STM32F100 series microcontroller chip that was embeded on STM32 Value Line (VL) discovery development kit (See figure 1). As you know from my previous article, STM32 VL discovery development kit has been equipped with ST-LINK/V2 programmer. Okey ... let’s continue read this article and practiced by follow the guidance on this project, in order you can build your own STM32 project at home.
1. Project Materials
To build this project, we have to has the project materials. Below I write-down the needs hardware and software in order you can make this project realized.
A. Hardware needs
(1) STM32 VL discovery development kit - STM32F100 (ARM Cortex M3).
(2) Data cable (USB type-A to Mini USB type-B).
(3) Computer/Laptop.
B. Software needs
(1) Software GNU Embedded Toolchain for Arm (Compiler), GCC ARM.
- GCC ARM released 2016 - Download here!
- [Update] GCC ARM released 2019 - Download here!
(2) Software Program Editor, CooCox CoIDE. Download here!
(3) Software Program Downloader, STM32 ST-LINK Utility. Download here!
For your information, all of the software above is free software. We can use it without time and feature limit. If there are errors on the download link, you can download all of the software from my drive (Click here!), happy download!
2. Interface STM32 VL Discovery Development Kit with Computer
To start the project, at the first, you have to make your computer connect to the STM32 VL discovery development kit via USB port. See figure 2.
Figure 2. Interfacing STM32F1 VL discovery development kit with computer
Then test the STM32 VL discovery development kit to know this development kit working properly with follow the steps below:
1) Ensure that jumper JP1 and CN3 has been installed.
2) Connect the STM32 VL discovery board with computer via a USB type-A to Mini-B cable through USB connector CN1. It will powered the board.
3) Press user button B1 (Bottom left corner of the board).
4) Observe how the blinking of the green LED LD3 change according to clicks on user button B1.
5) Each click on userbutton B1 is confirmed by the blue LED LD4.
6) If the LED behaviour on the STM32 VL discovery development kit as shown on the point 4 and 5, it is mean that the STM32 VL discovery development kit is working properly and ready to use.
3. The installation of the needed software
3.1 Install The GNU Embedded Toolchain for Arm (GCC ARM)
From ARM developer official website (www.developer.arm.com), we know what is GNU Embedded Toolchain for Arm? Here is the complete description:
“The GNU Embedded Toolchain for Arm is a ready-to-use, open source suite of tools for C, C++, and Assembly programming targeting Arm Cortex-M and Cortex-R family of processors. It includes the GNU Compiler (GCC) and is available free of charge directly from Arm for embedded software development on Windows, Linux, and Mac OS X operating systems.”
To getting started install GCC ARM, just double-click the installer file (exe) that you have been downloaded from ARM developer website. See figure 3!
Figure 3. GCC ARM installer file
Important:
The important thing when we install the GNU ARM is we have to memorized the GNU ARM installation path (directory). Because the GNU ARM installation directory will become directory for Coocox CoIDE (on sub directory bin) and Coocox CoSmart (on the store folder of arm-none-eabi-gcc.exe file) installation.
Figure 4. GCC ARM installation path (directory)
On my computer, the GCC ARM installaed on C:\Program Files (x86)\GNU Tools Arm Embedded directory. I use 64-bit Windows 7 operating systems on my computer.
3.2 Install Coocox CoIDE
After you have been finished install the GCC ARM, next install Coocox CoIDE. Coocox CoIDE is a software where we can create C/C++ program to configure STM8 or STM32 processor utilities. To getting started install Coocox CoIDE, double-click the Coocox CoIDE installer file (exe) that you have been downloaded. See figure 5!
Figure 5. Coocox CoIDE installer file
Important:
If Coocox CoIDE software has been installed successfully. Run Coocox CoIDE software to select the toolchain path for GCC ARM compiler. Follow the steps below!
1. Select Project on Menu bar (See figure 6).
2. Choose “Select Toolchain Path” option (See figure 6).
3. Browse the GCC ARM installation directory. Select on the “bin” sub-directory. (See figure 7).
C:\Program Files (x86)\GNU Tools Arm Embedded\9 2019-q4-major\bin
Remember the GCC ARM installation path (directory). See figure 4!
4. Click OK. (See figure 7).
Figure 6. Coocox CoIDE - Select Toolchain Path
Figure 7. Coocox CoIDE - Browse the directory of “arm-none-eabi-gcc.exe” file
3.3 Install STM32 ST-LINK Utility
Next, install STM32 ST-Link Utility software. STM32 ST-Link Utility is a software from ST microelectronics (STM) that have function to STM32 microcontroller chip programming (write, read, verify, and erase). To get started install STM32 ST-Link Utility, double-click the STM32 ST-Link Utility installer file (exe) that you have been downloaded. See figure 8!
Figure 8. STM32 ST-Link Utility v4.5.0.exe file
After STM32 ST-Link Utility has been installed on your computer, please try to open it for the first time. Figure 9 show the STM32 ST-Link Utility v4.5.0 software view.
Figure 9. STM32 ST-Link Utility v4.5.0 software view
4. Getting Started to New Project Building
After you have installed all of the needed software on part-3 and connect your STM32 VL Discovery to computer with follow the figure 2 above, now it’s time to get started build your first project.
STEP 1: Open Coocox CoIDE
For the first step, open Coocox CoIDE software from windows start menu or its shortcut on your computer desktop.
Figure 10. Coocox CoIDE has been opened
STEP 2: Select Chip on Coocox CoIDE Component Repository
Before you create a new project on Coocox CoIDE, you have to select a chip manufacturer, in order you can select a chip that you will use. To select a chip that you will use to build your project, click on “View” menu on the Coocox CoIDE menu-bar and then click “Repository” option, or you can also open it by click “Browse in Repository” link on “Welcome” tab after you open Coocox CoIDE software. See figure 11.
On the Welcome tab of Coocox CoIDE, there is “Component Repository” description. There inform us that component repository contains a lot of high-quality and reuseable source code which we call components, including peripherals, drivers, examples, and middleware components. See figure 11.
Figure 11. Select chip on Coocox CoIDE component repository
Until this article wrote, Coocox CoIDE has supported for microcontroller chip development from some chip manufacturer, i.e. ARM, Atmel, Energy Micro, Freescale, Holtek, TI, NXP, Nuvoton, ST, Toshiba, Spansion, and Active-Semi. See figure 12.
Figure 12. Chip manufacturer that supported by Coocox CoIDE
On this first project, we use STM32 VL discovery development kit from ST microelectronics where microcontroller chip STM32F100RB series has been embedded on that board. So on this step, select “ST” for the chip manufacturer (See figure 13) and STM32F100RB for the chip series (See figure 14).
Figure 13. Select “ST” to select ST microelectronics from microcontroller chip
Figure 14. Select STM32F100RB series
After you click a microcontroller chip series from a chip manufacturer, on the “Peripheral” tab of the Coocox CoIDE repository inform that STM32F100RB series from ST microelectronics is the selected chip for a project. See figure 15.
Figure 15. STM32F100RB series (ST microelectronics) is the selected chip
STEP 3: Create New Project On Coocox CoIDE
If you have select a chip which you use on Coocox CoIDE component repsitory, now you can getting started to create new project. To create a new project, start with select “Project” menu on Coocox CoIDE menu-bar and then select “New Project” (See figure 16) until New Project windows opened (See figure 17).
Figure 16. Create new project on Coocox CoIDE
On the New Project windows, determine the Project Name, un-check “Use default path”, and determine a directory as the Project Path. After that, click “Next” button, See figure 17!
Figure 17. Determine the project name and its storage path (directory)
After you determine the Project Name and Project Path, on the New Project windows will opened two option of “Model” (New project base). The two model are “Create a new project based on your target chip” model or “Create a new project based on your target board” model (See figure 18 and figure 19). You have to choose one of them.
Figure 18. Create a new project based on your target chip
Figure 19. Create a new project based on your target board
For this project, select “Create a new project based on your target chip” model and then click “Next” button. After you have chosen one of the new project model, on the New Project windows will opened microcontroller list from the chip manufacturer which you have choose on Step 2 (Select chip on Coocox CoIDE component repository) above, i.e. STM microcontroller (ST).
Figure 20. STM microcontroller chip list on New Project windows
Select the same series of microcontroller chip with microcontroller chip series that you have been selected on Step 2, i.e. STM32F100RB and then click “Finish” button. Next the New Project creation process will run for a moment and if the process has been finished, main.c program file will be generated automatically on Coocox CoIDE “Target” section. See figure 21.
Figure 21. Main program (main.c) file has been created
To open the program editor, please double-click the main program (main.c) which has been generated on Coocox CoIDE “Target” section (See figure 22). Edit or modify the program to configure the STM32 microcontroller functions.
Figure 22. Program editor - coocox CoIDE
STEP 4: Select Basic Components On Coocox CoIDE Repository
Before you create, edit, or modify the program, you have to select some “Basic Components” from “Peripheral” sub-tab on Coocox CoIDE component repository tab (See figure 23) which needed to make the project running as your expectation. Because the selected basic components will included the related library files which will useful to help the system developer when he/she create, edit, or modify the program. There are five basic component category, i.e. COMMON, BOOT, PERIPHERAL (Chip Manufacturer), PERIPERAL (Coocox CoIDE), and RTOS. See figure 23.
Figure 23. Basic Components category on Coocox CoIDE component repository
Important:
On several basic component, sometime require the other basic component and it will auto-select when the basic component selected.
Figure 24. Auto selected basic components when GPIO selected
For example, on this project we need “GPIO” basic component. From figure 24, we know that when we select GPIO component, there are others three basic components which auto selected, i.e. RCC (Reset and clock control driver), CMSIS Boot, and CMSIS Core.
STEP 5: Create Program On Coocox CoIDE Program Editor
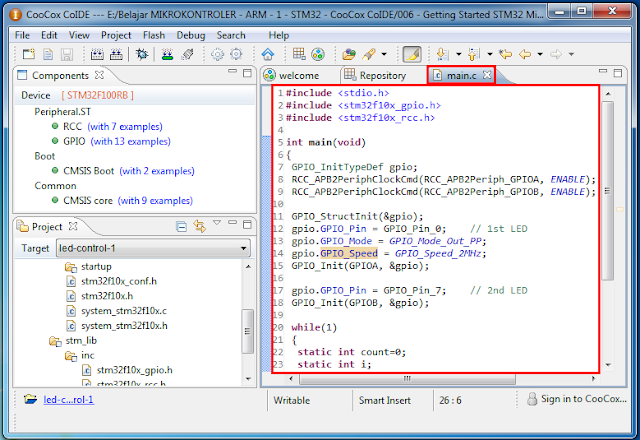
On this first project, we will create a program to control two LED (Ligth Emitting Diode) which installed on PA0 and PB7 (On STM32 VL discovery development kit). Write the program below on the Coocox CoIDE program editor, see figure 25!
Figure 25. Write the program on Coocox CoIDE program editor
This program will make LED components which installed on PA0 pin dan PB7 pin light up alternately. Below is the full program:
Step 6: Build The Program
In order the program can be downloaded (sent) to the target microcontroller chip, so the program must be compiled (built) first before downloaded. To do so, click the build button or we can use shortcut-key F7. See figur 26.
Figure 26. Build the created program
If the build process run successfully, on the Coocox CoIDE console section will generate notification that “ BUILD SUCCESSFUL” as we can see on the figure 26.
Step 7: Program Download To The Target Microcontroller Chip
To download (send) to the target microcontroller chip, select “Flash” menu on the Coocox CoIDE menu-bar, then click “Program Download” option. See figure 27.
Figure 27. Download (send) program to the target microcontroller chip
After that, the download process will run. Wait for a moment. If the download process run successful, on the Coocox CoIDE console section will generate “Flash download information” that inform that program download process into the target microcontroller chip has done (Erase: Done, Program: Done, Verify: Done). See figure 27.
To ensure that the built program has downloaded into the target microcontroller chip, please observe the project hardware. Is the LED behaviour has been as your expectation? If yes, that is sign that the built program has downloaded well.
Program Download Using ST-Link Utility
To download program (hex file) using ST-Link Utility software from ST microelectronics, please follow the steps below:
1. Connect STM32 VL discovery development kit to computer via USB port. (See figure 2 above)
2. Open ST-Link Utility. (See figure 28)
Figure 28. ST-Link Utility
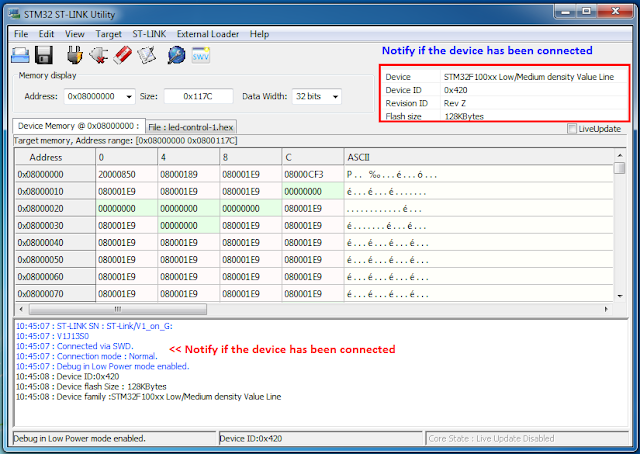
3. Connect STM32 VL discovery with STM32 ST-Link Utility. (See figure 29 and figure 30)
Figure 29. Connect STM32 VL discovery with STM32 ST-Link Utility
Figure 30. Notification if STM32 VL discovery and STM32 ST-Link Utility has been connected
4. Open and select program (hex) file. (See figure 31, figure 32, and figure 33)
Figure 31. Open hex file to download
Figure 32. Select hex file
Figure 33. Hex file has opened
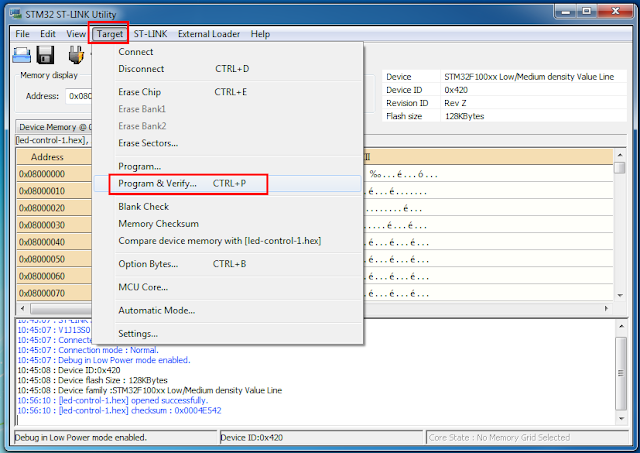
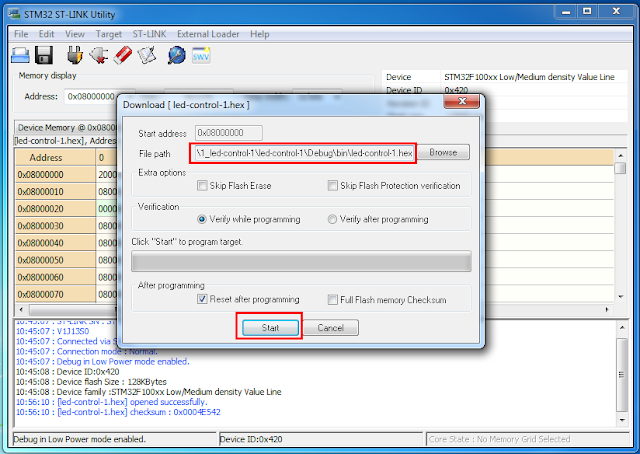
5. Download the program (hex) to the STM32 microcontroller target. (See figure 34, figure 35, and figure 36)
Figure 34. Download or send the program (hex) to the target STM32 microcontroller
Figure 35. Ensure the file path has been right and start to download the program
Figure 36. Notification if the program (hex file) has downloaded completely
6. Disconnect ST-Link from the target STM32 microcontroller. (See figure 37)
Figure 37. Disconnect ST-Link from the target STM32 microcontroller
7. Observe the project hardware, has the result as the expectation or not yet? If yes, that is sign that the built program has downloaded well.


0 comments:
Post a Comment