robotics-university.com | Hello my friends, learning LabVIEW was become one of my activity in late several days. On tutorial today, I will guide you how to download and install LabVIEW Interface for Arduino (LIFA) toolkit.
What is LIFA Toolkit?
What is LIFA Toolkit?
LIFA is a LabVIEW toolkit package to build interfacing between LabVIEW with Arduino board. LIFA toolkit developed by one of National Instrument (NI) engineer, Sam Kristoff on 2012. For you who haven’t National Instrument data acquisition (DAQ) device like NI USB-6008 or NI USB-6216, you can use Arduino board to build data acquisition application project.
The LIFA toolkit provides an easy to use interface for the Arduino microcontroller platform. The LabVIEW Interface for Arduino allows you to quickly and easily create graphical user interfaces for virtually any component that is compatible with the Arduino microcontroller. This open source toolkit is made for customization allowing users to create custom drivers for their sensors. Please visit www.ni.com/arduino for more information.
Figure 1. Search LIFA toolkit using Google search engine
To start download, we have to search the LIFA toolkit download page on internet by search it using Google search engine (or you can use another search engine on your convenient). On this tutorial, I use Google search engine. To start searching LIFA toolkit download page, I type key-word “labview interface for arduino lifa” on the Google key-word field. See figure 1 above! Then press Enter key on the keyboard.
Figure 2. Get a link to download LIFA toolkit on Google
No need long time, some recommendation LIFA toolkit download link displayed. Click the top link! Because that link title is the nearest with our key-word which we have typed before on Google key-word field. After you click that link, LIFA toolkit download page will opened for you. See figure 3!
Figure 3. LIFA toolkit download page
For the shortcut, here is I give you a link that you can click or copy/paste on your web browser directly to open LIFA toolkit download page, this is the link: http://www.ni.com/gate/gb/GB_EVALTLKTLVARDIO/US
A. Download Virtual Instrument Package Manager (VIPM)
To start download VIPM software, click the VIPM download button (See figure 4). Don’t be wrong about the operation system that installer on your computer, Windows or Mac? Make sure you are click the right VIPM download button for your computer, make it match with your used operating system.
Figure 4. Download button of VIPM (Virtual Instrument Package Manager)
After we have downloaded VIPM installer file, we recommended to install it first before we install LIFA toolkit. Or if you have downloaded and installed this software on your computer with follow my guidance in my previous article, entitled LabVIEW & Virtual Instrument Package Manager (VIPM), you can skip this step and go to next step, i.e. download and install LIFA Toolkit on VIPM.
B. Download LIFA Toolkit File From FTP & Install It Offline
If you want to save LIFA toolkit file (*.vip file) on your computer hard-drive (HDD), you can click “Download Toolkit from FTP” button (See figure 5).
Figure 5. LIFA toolkit file download button - from FTP
After “Download Toolkit from FTP” button clicked, a download page will opened for you. See figure 6!
Figure 6. Download LIFA toolkit file (*.vip) from FTP
Please download the latest version LIFA toolkit file by click the youngest download link. See figure 6! If you have clicked the download link, a “Save As” window will appear. See figure 7! On that window, select a storage directory to store the LIFA toolkit file and the click “Save” button, so the download process will started.
Figure 7. LIFA toolkit file (*.vip) ready to save on a directory
Offline Method of LIFA Toolkit Installation (No need Internet Connection)
After we have been success in download and save the LIFA toolkit file on our computer storage (directory), now it’s time to install it on VIPM toolkit list, in order we can use it to build LabVIEW application interfacing with Arduino board. Because we had have LIFA toolkit package file (*vip file), to install it we no need internet connection for our computer when the installation process is running.
To start install, first, open VIPM software. See figure 8!
Figure 8. VIPM going to open
If your VIPM software has been opened, next click on “File” menu on “JKI VI Package Manager” menu-bar, then select and click “Open Package File(s)” option. See figure 9!
Figure 9. Open vip file of LIFA toolkit
After that, find the storage directory of the LIFA toolkit file. See figure 10! If you have been found it, then click the LIFA toolkit file (*vip) and click “OK” button to continue the next step.
Figure 10. Find storage directory of the LIFA toolkit vip file
If OK button has clicked, next a "LabVIEW Interface for Arduino" installation page will opened. See figure 11!
Figure 11. Install button to start LIFA toolkit offline installation
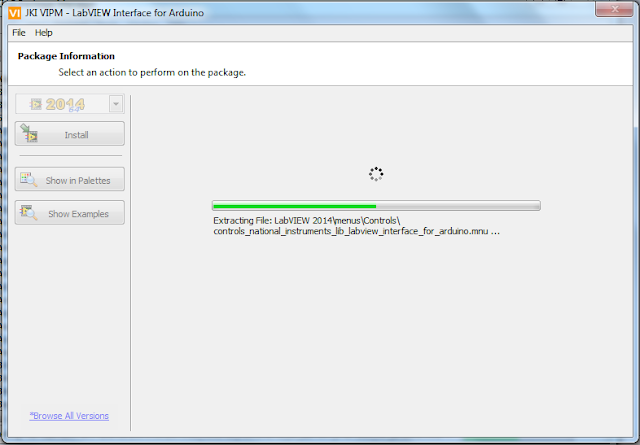
Click “Install” button and the LIFA toolkit offline installation process will start to run. See figure 12!
Figure 12. Offline Installation of LIFA toolkit is in progress
Wait the running installation process until complete, don’t interrupt the process!
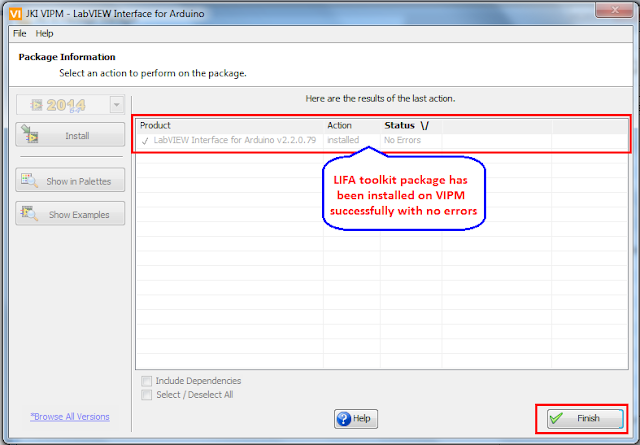
Figure 13. LIFA toolkit has been installed on VIPM successfully with no errors
If the running installation process has no errors, so there will appear an information that the installation process has been complete running and successfully as shown on figure 13 above. If like that, the LIFA toolkit has been ready to use for you.
C. Download & Install LIFA Toolkit with VIPM (Online)
On this stage, I will guide you to download and install LIFA toolkit with VIPM at once. It mean that on one click of “Download Toolkit with VIPM” button, the download and install process will do successively. It will speed up working time. To start do that, click “Download Toolkit with VIPM” button. See figure 14!
Figure 14. Download & install LIFA toolkit with VIPM button
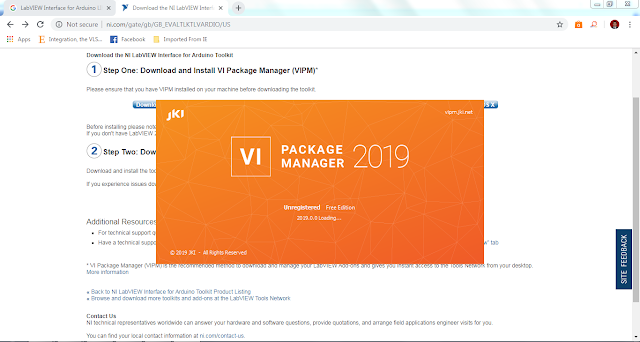
After “Download Toolkit with VIPM” button clicked, the VIPM will going to open. See figure 15!
Figure 15. VIPM going to open
If the VIPM software has opened, next a "LabVIEW Interface for Arduino" installation page will opened following it. See figure 16!
Figure 16. Download and Install LIFA toolkit with VIPM (internet connection required)
Click “Install” button on "LabVIEW Interface for Arduino" installation page to start install it on VIPM. But, make sure that your computer connect to internet network (Online). Because this installation process need to internet connection.
Figure 17. LIFA toolkit installation progress
Figure 18. LIFA toolkit has installed on VIPM successfully
D. After the LIFA Toolkit Installed on VIPM Package List
Figure 19 showed that LIFA toolkit package has been installed successfully on VIPM package list.
Figure 19. LabVIEW Interface for Arduino (LIFA) toolkit has been installed on VIPM package list
If LIFA tool has provided on VIPM package list, it mean that we have can use it to build systems or application using LabVIEW and interfaced with Arduino board.


0 comments:
Post a Comment